skip to main |
skip to sidebar
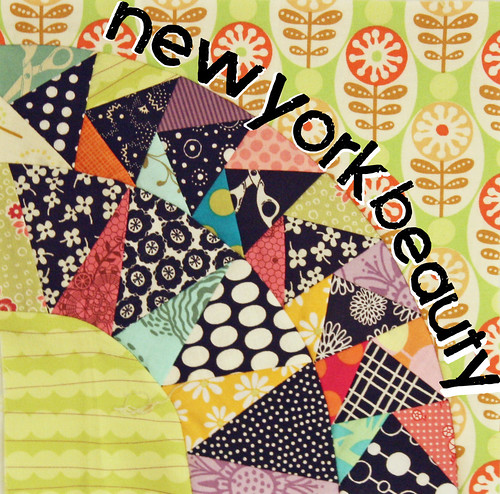 Are you up for the challenge? Ready to put your paper piecing hat on? Let's take on some New York Beauty blocks! In this post I will share some links and tips to get you started [and announce the fabric winner!] Perhaps the most important tip I can share is: just go for it! Don't be intimidated by paper piecing or curved piecing [like animals, I think they can smell fear :] It may take a little practice, but I am confidant that if I can make these blocks, so can you.
 First the patterns. There are books and free piecing patterns all over the place. The patterns that I used came from Ulas Quiltpage. [a note: some of them I slightly adapted/changed] These are great and fairly simple designs. If you check the pic above, you can see that I used a variety of patterns. If you are looking for something a little more complex, check out these patterns over - they are not necessarily more difficult, but many have multiple paper pieced sections. [the block at the top of this post is from those patterns.Component 1: Paper PiecingOnce you understand the basics of how to paper piece - the sky is the limit. I recommend heading over to the Quilter's Cache. They offer great step by step instructions and diagrams to help you get the hang of it.The biggest issue that I have with paper piecing is choosing the right size fabric. My recommendation: go big. Yes, it is a little wasteful, but choosing a bigger scrap and trimming the excess makes the process go much smoother. As you make your blocks and gain experience, you will become a better judge of what size piece you need.Another tip - when you trim the paper pieced section, check your template/pattern and make sure that it has a 1/4" seam allowance on the outer edge of the section. Otherwise, when you sew the block together, all of your precious little points will be cut off! And that is part of the beauty of paper piecing - it is so much easier to get all those perfect little points using this method than traditional piecing.
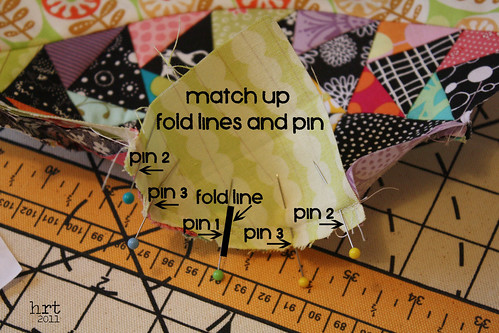
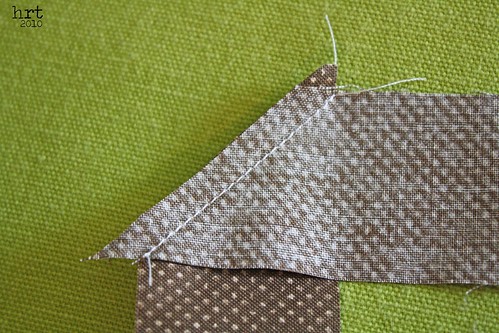
Component 2: Curved PiecingAfter paper piecing, the solid sections remain. To make sure that the sections line up perfectly, I fold each of the two sections I am going to sew together in half, making a crease. Then I match up the creases [with the sections right sides together] and pin. Then I pin the two ends, then pin toward the center. Once the two sections are sewn together, notch along the seam allowance. Then press the seam allowance toward the solid section.I would love to see any nyb blocks that you whip up! And now for the winner [drumrooolllll, please]: Cathy Tomm! I sent you an email! Just a note: Cathy was not my first random winner, the first person was a no-reply blogger and left me no way to contact them. Thanks everyone who played along - I enjoyed reading and responding to everyone's lovely comments :)
 Yes, this is another post about swapping :) I'm not sure if you know Ayumi, if not then you definitely need to meet her! Maybe you just don't realize you know her, she has several projects that have been featured in the beloved Stitch magazine [which is going quarterly next year! yay!] She not only makes lovely things, she has a kind heart. I have been oohing and aahing over some Mister Donut fabric that keeps taunting me around blogland.
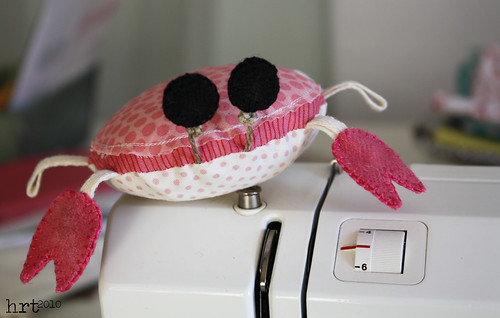
 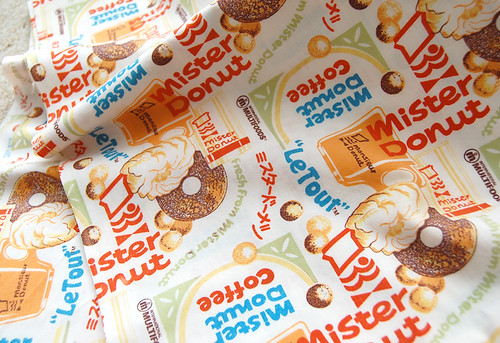 On special occasions my mom and I would go to Mister Donut before school. I always loved the twisted creamstick/glazed donut things covered in chocolate. They are special memories, the Mister Donut was replaced by a Donut Connection, and then finally a pizza shop. Many have forgotten the smell of fresh baked donuts [we don't even have a Dunkin Donuts in our area]. Anywho, I gushed over Ayumi's stash and she agreed to a swap. What did she want? A crabby pinnie of course :) So meet Miss Crabby, all decked out in pink!
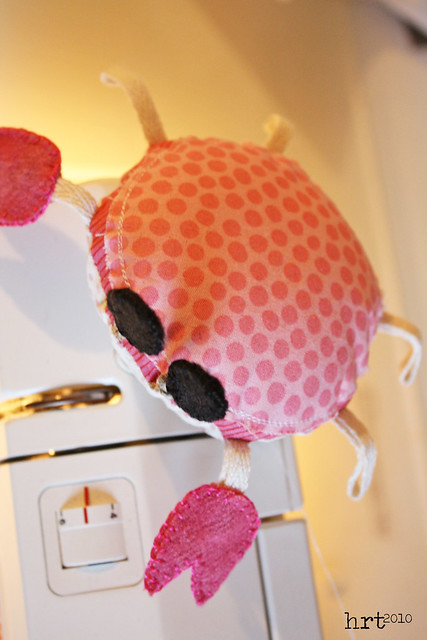 If you want to make one for yourself, my humble attempt at a tutorial can be found here. I am pleased with how she turned out and glad that she has found a happy home!
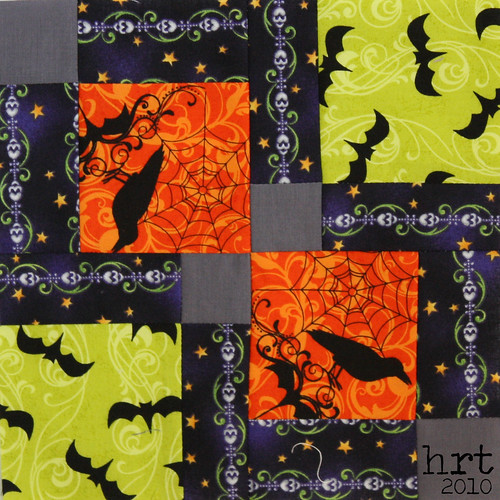 For the Block Swap 2, miss rabidchipmunks asked us for a disappearing nine patch using some funky Halloween prints. A lot of fun, even if I did cut one of the blocks wrong :)I am enjoying seeing all kinds of beautiful color outside my window - I love fall. Hoping to fit in a few more warm days though!
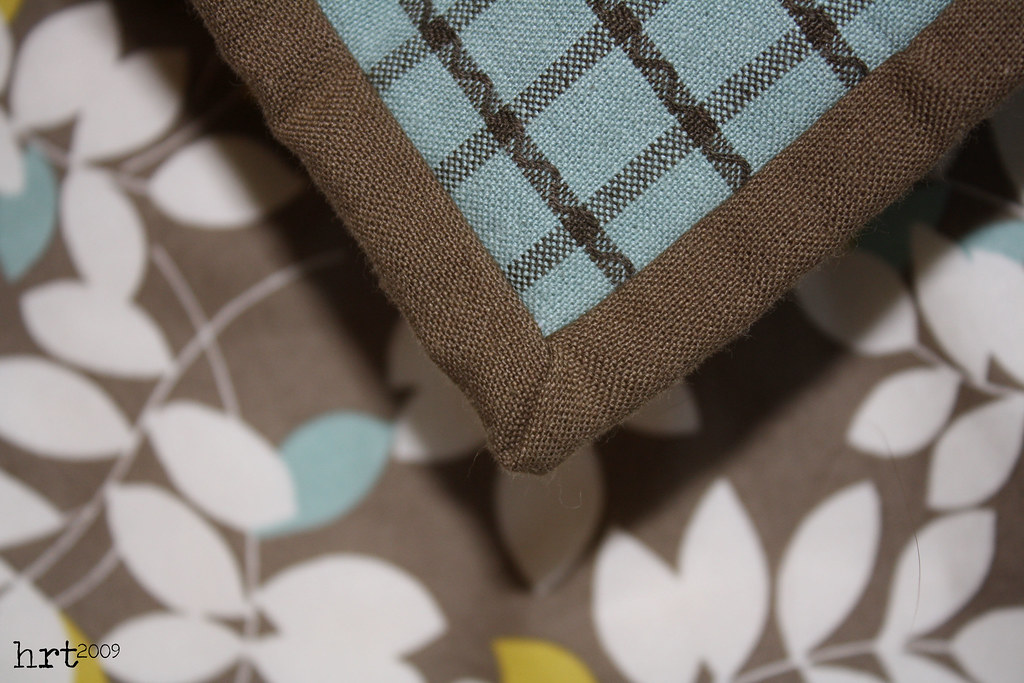
 If you've just tuned in, I have been laying out a few ground rules for making fab pillows and cushions in the Pillow Basics Series. Today will be the final installment [Hurrah!]. I typically finish my pillows with either piping or a traditional quilt binding.
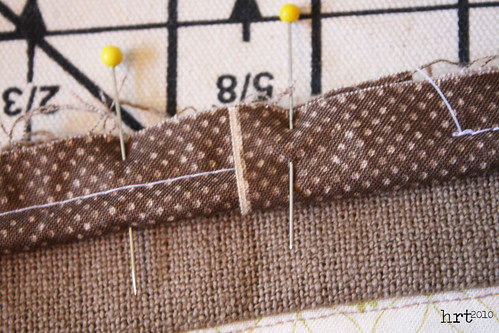
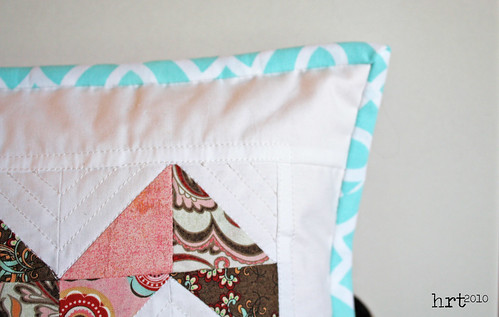 If you are binding your pillow...Take your 2.5" strips and press it in half so that you have a long 1.25" strip. Layer your pillow with wrong sides together and the binding on top of the front. Sew the strip around the edge of the pillow using a 1/4" seam allowance. [Here is a great tutorial for mitered corners] flip the folded edge of the binding over to the back of the pillow and handstitch in place - yes, handstitching does take a while, but you have a very pro looking end result!
 If you want to use piping...First we are going to make our own piping using the 1.5" strips you cut. I generally use 3/8" cording from JoAnns, but you can choose the thickness you like best. Lay the cording in the center of your fabric strip.
 Fold the strip in half around the cording, pin.
 I have an ab-fab foot that is made for sewing piping - it has a groove in the center that holds the cording in place. You can make piping this way with a zipper foot as well. I like to set the needle position to as far right as it will go and the stitch length as long as it will go. Begin stitching 1" from the 'start end' [rember when we talked about the selvage in lesson two?]; stitch.
 Pin the cording in place along the edge of the top of the pillow. Ease the corners by snipping into the piping. Tuck the end under the 'start end'
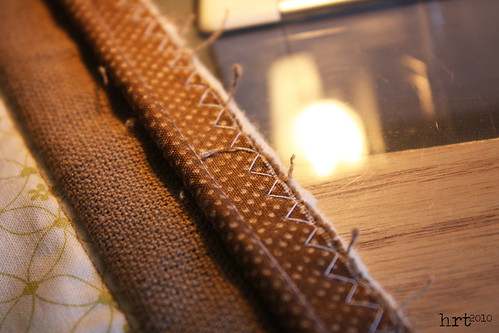 Using a wide zig-zag stitch [with the regular sewing foot], sew along the edge of the piping to secure it into place.
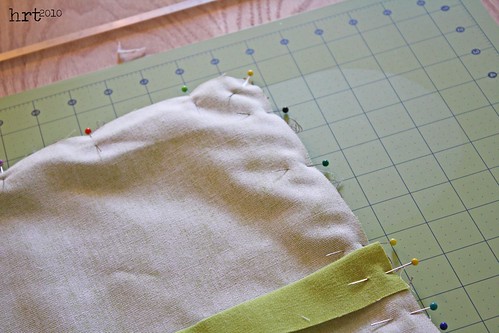 Layer the pillow back over the pillow front with right sides together, pin. With the zipper or cording foot attached, move the needle position all the way to the right and then move it back to the left one click. [This will ensure that none of those basting stitches show on your finished pillow] Stitch tightly along the edge of the piping. If you are using a thick fabric for your piping, you may want to switch to a denim needle in this step.
 Trim the corners, rounding them to match the piping. Turn. VOILA! You're pillow is finished and ready to spice up your sofa!
 This wonky star pillow is up for a new home in my shop!THERE'S STILL TIME! Don't forget to sign up for the pillow giveaway!! Comment on this post...ps: If you are enjoying these tutorials, feel free to add my button to your blog :]
 [note: I have had a couple of people have trouble accessing the tutorial on google docs. I am happy to 'share' the file with your google docs account, just choose that option after logging into your account. I have also uploaded the tutorial as a photo onto flickr.]
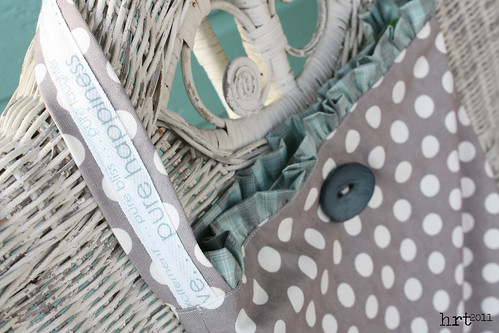
Scrappy. Pincushion. Swap. My new favorite swap! I really enjoyed round 1 so I have signed up for round 2 - I think the hardest part is deciding what to make. Last round I made 3 or 4 different pinnies before ending up with crabby {who I think turned out quite nicely}. He is happily living in his new home across the pond. Perhaps you would like a crabby to call your own? Here is a link to his tutorial {I put the pdf up on google docs - PLEASE let me know if you have any trouble accessing it!}.I would love to see a picture if you make one :D
enjoy.
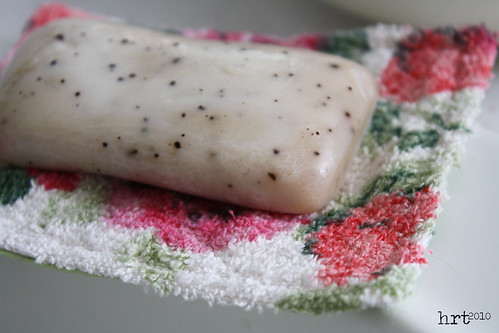 Yes, I did have to google 'names for bathrooms' to find the correct spelling for loo [formerly I thought it was like 'in lieu of']. We have several friends, both online and the neighborly kind, that make handmade soaps. I really love how clean they get your hands without being harsh on your skin. I was, however, tired of cleaning soap gunk off of the sides of the sink and also a little tired of having the soap slip into the sink bowl. Then I remembered this post, which links to another post, which references a tutorial found here about a dish drying towel made from old bath towels. [there's another tutorial here] In a few frenzied minutes of cutting and stitching had this:

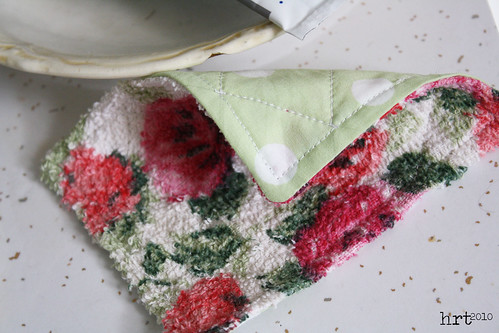 Very, very simple:1. cut 2 - 4.5" x 5.5" rectangles [one from a quilters weight cotton and one from a towel]2. with right sides together, sew the two pieces together. leave a small opening on one side.3. turn, press, sew a scant 1/4" along each side. quilt as desired [I used a 1.5" grid pattern]
 I also wanted to share a space saving little number that I made for my jewelry. Again, not my idea - it's just an old frame that I painted white and stapled screen to. Little bent wire hooks hold things in place.I need to make new curtains for the bathroom as well... another project for another day...
My obsession with pillows has led a couple of people to ask if I have any tips or a basic tutorial. I love to share and teach, so over the next few weeks you can watch as I put together a pillow with step by step instructions. There is nothing new or amazing with my instructions - just things I have picked up along the way or have found to be time saving. [after all, pillows aren't exactly a new thing] I created a button that you can add to your blog it's on the right sidebar -->Step #1
 I usually use a pieced or appliqued top, so that needs to be finished first. note: squares work best as the majority of pillow forms are square and come in 2" increments [i.e. 10", 12", 14", etc.]Take your finished pillow front and lay it over a slightly larger piece of cotton batting. Smooth it out flat, then pin baste. [here is a tool I use that helps this process along] I do not find it necessary to add another fabric layer to this sandwich because when I wash my pillow cases I simply safety pin the back of the pillow to the front.Machine or hand quilt however you would like. If you machine quilt, trim the threads on the back as you start and stop sewing, but leave the ones on the front long.After quilting, remove the basting pins. Now, take a needle and thread it with one of the loose threads on the pillow top. One at a time, bring each of these threads through the stitching line to the back. This leaves you with a nice top - no little tiny thread-ends sticking out.Trim the excess batting so that it is even with the pillow front.WOW - I bet you are so excited for step #2 - it's coming soon...
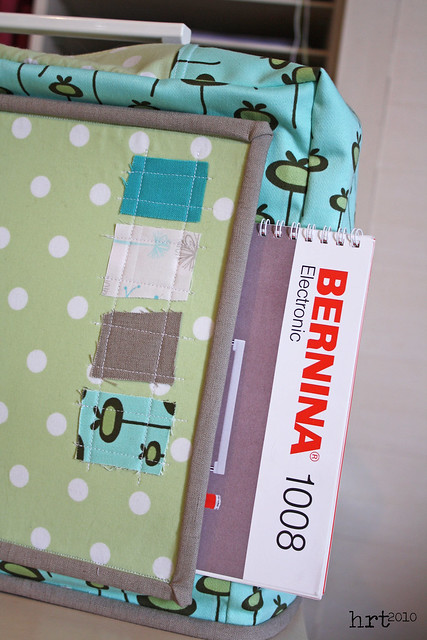
 Ever since Berni got back from her day at the spa, she has really turned into quite the diva - requesting her cover on when she isn't in use, the diligent use of the little dust brush she came with, and even demanding the use of a denim needle when sewing through 8 layers of fabric and a layer of peltex stabilizer. She has been sewing like a pro, so I can't complain. She has been content with the plain-jane vinyl, generic, red and white cover she came with for her whole life. The girls over on the ORBC discussion board started chatting it up about making new covers shortly before Christmas. I am proud to say that Berni is now sporting new digs - featuring some really lovely fabrics by Art Gallery [lining], Amy Butler [main panels and sides], and even some designed by the hub's mom, Marlene [polka dots on the pockets]!

 I came up with the pattern on my own, modeling it after her plain-jane original. It's completely lined and has an opening for the handle. [most of the patterns/tutorials I found online left out this important detail!]
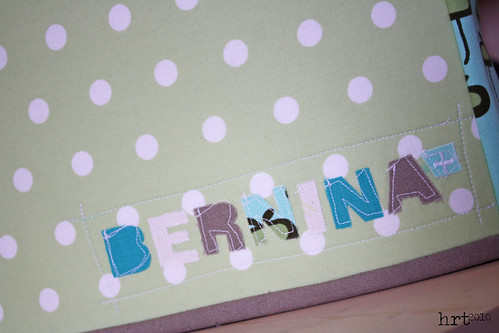 I am a little impressed with myself - I printed out the logo for Bernina, transferred it onto wonder under, ironed it on, then free-form outlined each of the letters with the machine. I am not real adventurous with machine applique, but this was fun and easy and turned out like I envisioned.
 The back shows off my love for those ticker tape quilts that have [seemingly] been showing up ALL over Flickr and the blogosphere - I would love to do a bed sized quilt with all my scraps, but haven't found the time or energy to take on this pursuit [yet!] Really they're everywhere: here, here, here, here, and even here...
 Look for a tutorial for the cover coming to a post near you!
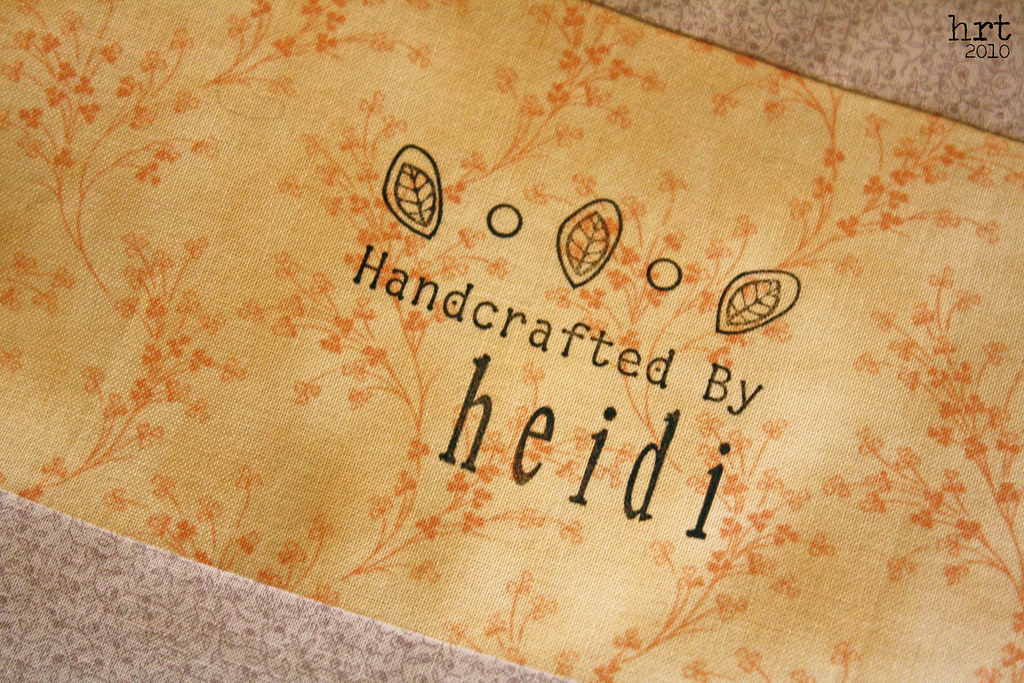
For a while now I have been experimenting with labels for quilts and other sewing projects. When I was in college, I was priveleged to hear from a quilt historian. She came with boxes filled with quilts and each of those quilts had a story to tell. Some of them were silent - little was known about who made them or when. I think it is important to make your mark, to think of each project [especially quilts] as a potential heirloom.
There are ALOT of ideas out there on how to make labels or where to buy labels [I'll add a few links at the end of this post]. The web is getting way too crafty :] Here are a few samples I came up with recently along with brief how-to's for each one:Label #1: inkjet fabric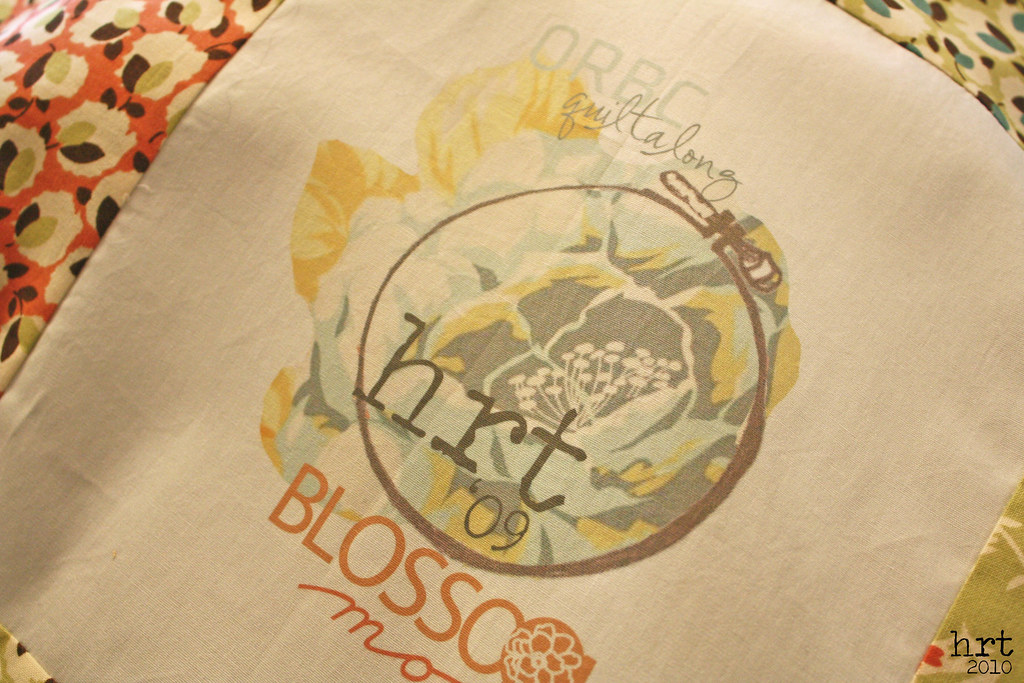 This label is for my ORBC quilt back. I love the way it turned out. I am an unabashed photoshop fan - this project was no exception.
1. To make the label, I went online and got the fabric card [pdf file with all of the fabrics] for the Moda Blossom line.
2. I opened the pdf file in photoshop and copied and pasted the design elements that I liked in the fabric card into a new document. I have a tablet and that made it super easy to 'cut out' the flower and such.3. I added my initials, the date, and other info to the label.
4. Print onto inkjet fabric. [I got a roll of it at JoAnn Fabrics; it's great, you can cut it to any size you want! The link is to the product I used, couldn't find it on JoAnn's site]
5. Follow the fabric instructions: for mine, that meant letting the ink set for 15 minutes, removing the paper, and then rinse with cool water.
Voila, you're a fabric designer! I did a sample and put it through the washer and dryer, the color stayed with no noticeable fading.
Label #2: twill tape tags
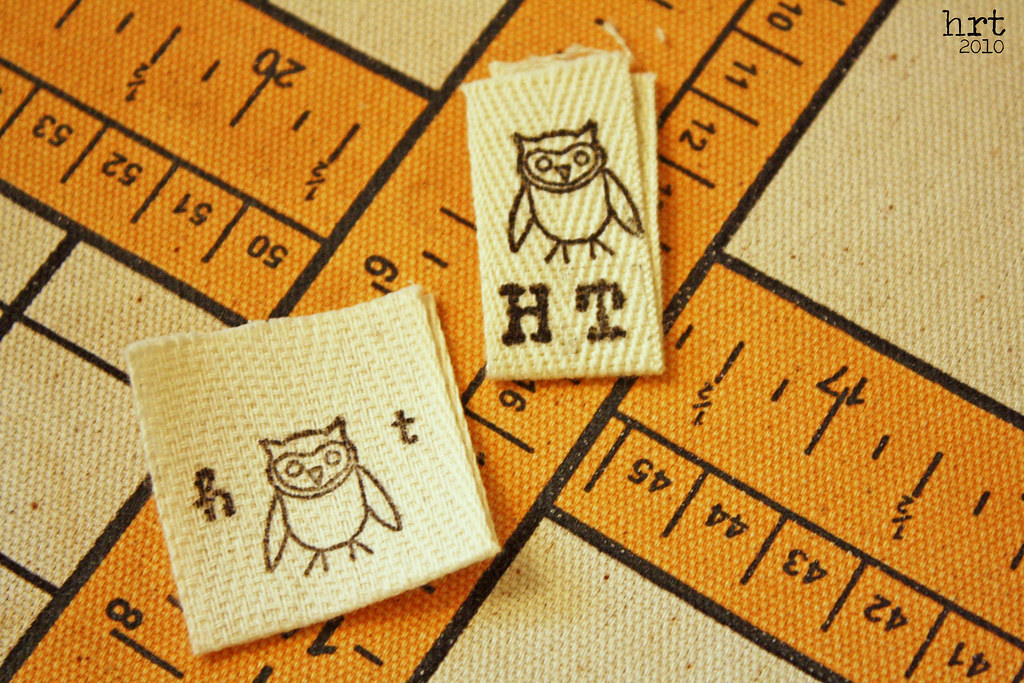 Super simple to make: I bought a couple of sizes of twill tape [or rug binding], picked out some stamps, and, most importantly, purchased a fabric stamp pad.
1. Cut twill tape to desired length; fold in half.
2. Stamp, stamp, stamp
3. Heat set on high [I used steam]
Label #3: stamped fabric
 Okay, enough with the steps: stamp on your fabric using the fabric ink, heat set.
Here are some other resources for labeling your quilts:
Iron-On Transfer Tags
Custom Manufactured Labels
Fabric Paint Stamp Pad [note: this is a great method for larger stamps, not so great for stamps with small, fine details]
Do you label your projects? How do you do it?
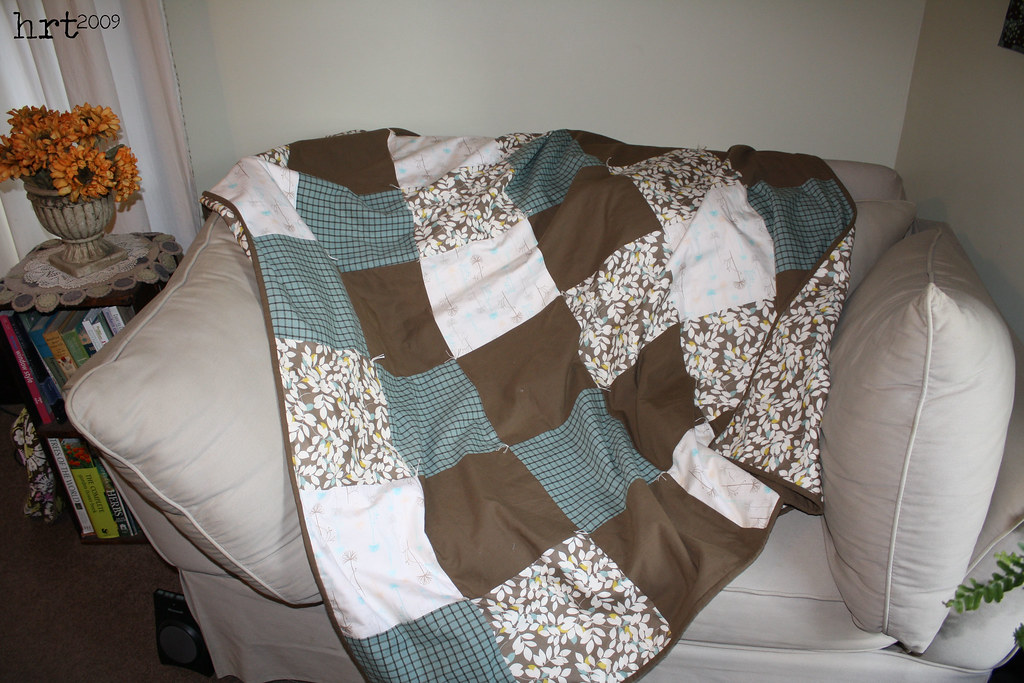 Hot off the presses, this little number has found a new home. My friend Anna is getting married in December and I whipped up this throw for her and her future hubby. Handmade is best for two reasons: (1) it is a unique gift made specifically for someone, crafted from the heart (2) being on a limited budget, I am able to gift something really nice for less than I would pay in the store (and with better quality). As mentioned previously, I don't quilt, so it's knotted, but I like the look. Though a simple project, I thought some of you out in the blogosphere might enjoy a short little tutorial with some helpful tips along the way. Without further ado, here's the recipe:
Easy-Peasy Quilt TutorialFinished Size: 60"x70" (10" Blocks)
Ingredients * 1 yard each of 4 coordinating fabrics
* 1/2 yard for binding* 3 1/2 yards for backing
* 2 yards batting (or enough to fit)
* Perle Cotton or crochet thread for knottingDirections
* Rotary cut each of your 1 yard cuts into 3 - 10.5" strips
* Cut each strip into 4 - 10.5" squares
[hint: I took some [not all] of my strips and sewed them together in pairs along the long edge. Before unfolding, I cut them into 10.5" pieces. Now when you open up the pieces you already have 2 blocks sewn together. Not sewing all of the strips together allows you more chances to vary the random pattern of the finished block layout]
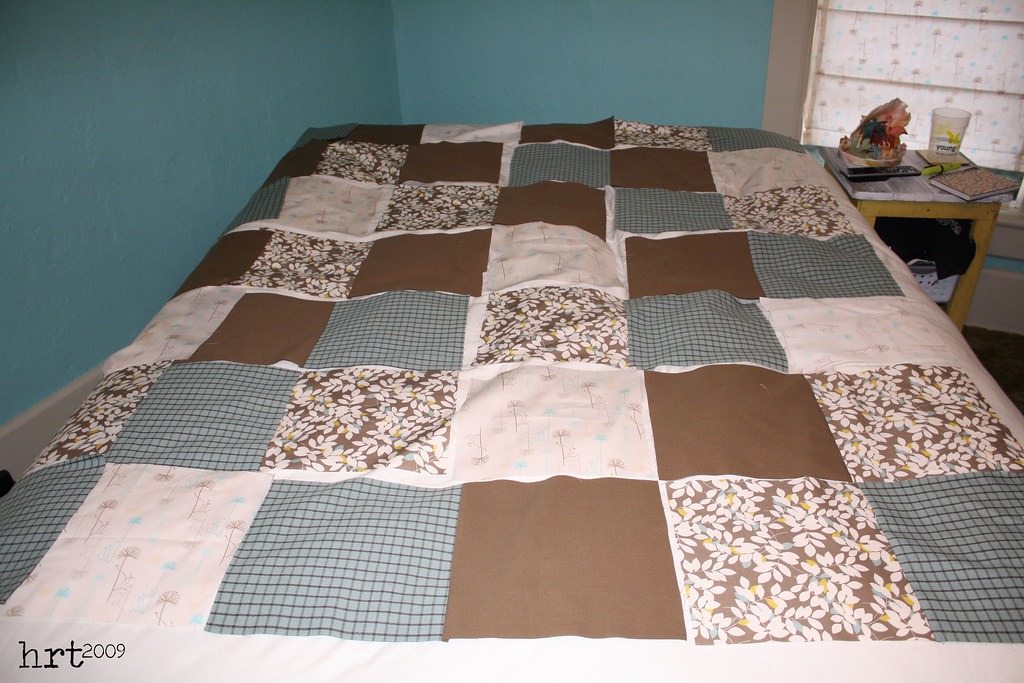 * Layout your blocks in 7 rows of 6 blocks each
[hint: take a photo of your layout, this will save alot of time when you can't remember which piece you liked where]* Sew the 6 blocks (each row) together[hint: PRESS. I used to avoid the iron for as long as possible, it seemed like such a time suck. But then I met Row... steamy, hot... wait we are talking about an iron here, no need to be alarmed. To be clear, my friend Jordan bought me a Rowenta smooth glide iron as a wedding gift and I LOVE it. Pressing during the process makes for a better outcome. After sewing a seam, press the seam without opening it up. Then open it up and press the seam to one side. Repeat this for EVERY seam]
 * Pin the rows rst (one row at a time). Make sure that your intersections line-up. Sew the seven rows together, continuing to press as you go.
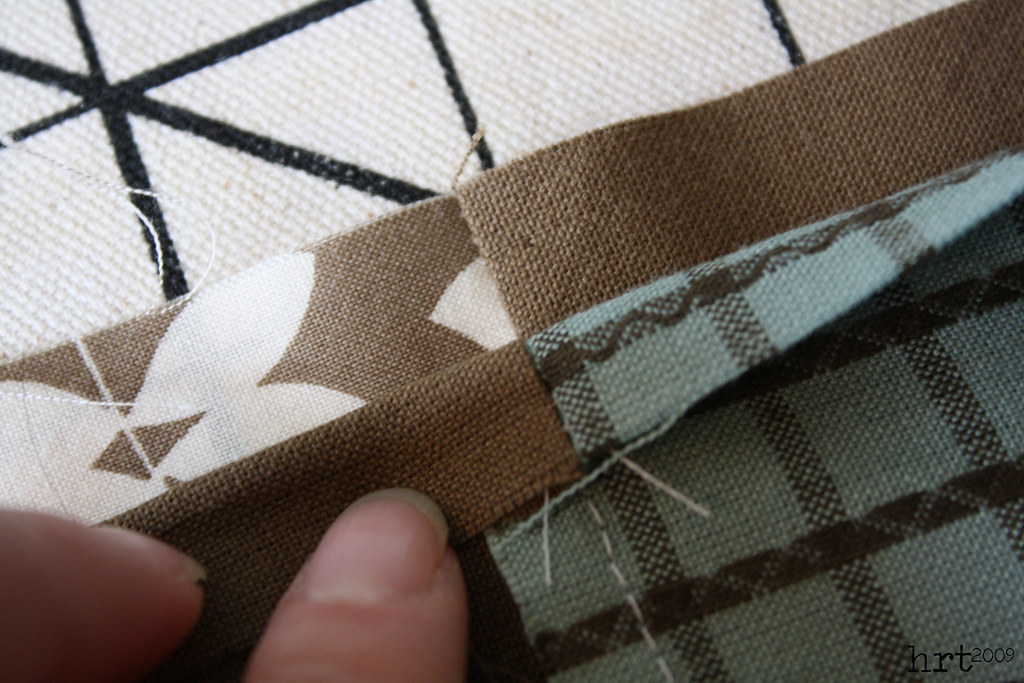
* Piece the backing: remove the selveges of your backing fabric cut a 75"x43" piece (43" is about the width of your fabric after you remove the selveges). Cut 2 - 20"x43" pieces; sew these two pieces together end to end (you now have 1 - 20"x86" strip). Sew the 20"x86" piece to the 75"x43" piece; trim the excess from the 86" piece so that it is even with the 75" piece. (you now have a 75"x63" piece)[hint: you may be asking yourself, 'self, why do I need a 75"x63" backing when my quilt is only 70"x60"?' I find it easier to trim your backing to exactly fit your quilt top once the 'quilt sandwich' is made. This is helpful because I am not a perfect cutter or sewer!]
* Make a quilt sandwich: lay out the backing wrong side up, place your batting on top of that, then your pieced top right side up. Voila! quilt sandwich. I use basting pins to hold my quilt together - starting from one end and working up, pin the basting pins where each of the blocks meets another one (where 2 or 4 points intersect)
* Trim the backing fabric and batting about 1/8" from the quilt top on all four sides
* At this point you pick your quilting option. Again, I don't quilt - so this comforter is knotted. Take the perle cotton or crochet thread and thread a needle that accommodates it. Pull the thread all the way through so that the 2 ends meet. Removing one pin at a time, knot the quilt where 4 corners intersect. A square knot is the most widely recommended knot for tying quilts. Here's a video!
* Prepare the binding strips: Cut 7-2.5" strips from the binding material. Here I will refer you to the best online tutorial I have seen on binding. Heather Bailey has great illustrations that are easy to follow along with.
 Enjoy your finished quilt!

 **note: there is still time to enter in the giveaway for new Seaside Home book! Comment on this post! I will announce a winner on the 15th :)
 Sweet and simple, I put together a little tutorial - here is a link to the pdf.
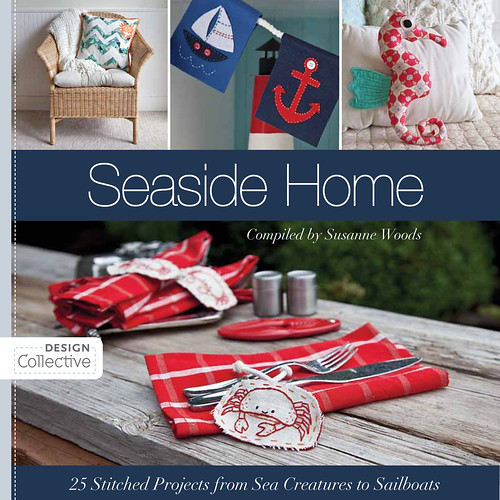


