
 When we last left our pillow, we had basted and quilted our pillow front. A note on the size of your pillow front: for a really full pillow, add 1/2" to your pillow form size; for a more relaxed fit [I prefer this] add 1.5" to your pillow form size.
Now we are going to cut out the rest of the pillow. These instructions are for an envelope style back. I tend to use this method because: a) you can easily remove the pillow form for cleaning or when changing decor; b) it's fairly simple; c) no scratchy zipper.
 From your backing fabric cut 2 rectangles. In this equation y = the measurement of one side your pillow [this is for a SQUARE pillow]. Measurement of each rectangle: y" by [(y/2) + 4]" For a rectangular pillow you will have two different side measurements, just plug these into the equation.
Fold one long edge of each rectangle over about 2" and press.
I will show you two methods for finishing the edges of the pillow.If you want to bind the edges like a quilt: cut 2.5" strips the width of the coordinating fabric. If you want to add piping/cording: cut 1.5" strips the width of the coordinating fabric. The amount of strips you will need is determined by the size of your pillow. To be safe I usually add up all of my sides [find the perimeter] and then add 10-12".
 Look at the selvage edge of your strips. [A tightly woven edge that runs along both outermost edges of a fabric's lengthwise grain. Selvage edges keep the fabric from fraying.] Generally one of the ends will be printed like the rest of the material i.e. it won't have words or be a different color. If your fabric has fringy edges, carefully cut the fringe off. Using this method will lessen the bulk where your ends meet as you sew around your pillow. If the fabric you are using no longer has a selvage or both ends are printed, just fold one end under [WST] 1/2" and press. This is your 'start' end once we begin adding the binding or cording to the pillow.
 Leave the 'start' end alone - go to the other short edge of your strip. Take another strip and lay it perpendicular over the other strip.
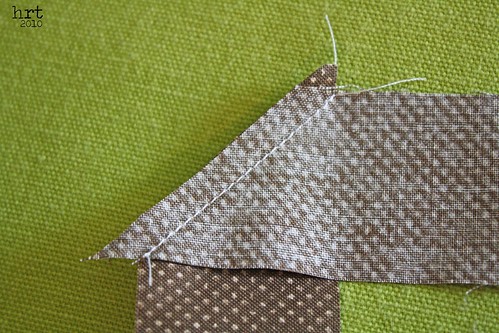 Sew at an angle from corner to the other. Trim off extra triangles. Press seam open. Repeat this step until you have one long strip. Using this method as opposed to sewing the strips end to end reduces the bulk.
ps: If you are enjoying these tutorials, feel free to add my button to your blog :]


No comments:
Post a Comment