Wednesday, November 25, 2009

o christmas tree...

Nothing says kitchy-vintage Christmas like a pink bottle brush tree! I recently decided to deck out the house using bunches of these little trees. A couple of thrift stores and an antique mall later, I realized that my dream of finding vintage trees was not going to come true. I looked online and favorited a few on etsy, bid on one on ebay... my thirst for little trees was not satisfied. Then it happened, I found a tutorial for dying your own trees! A quick trip to Pat Catans and I was home with nearly 75 trees of all sizes (up to 5" of course).

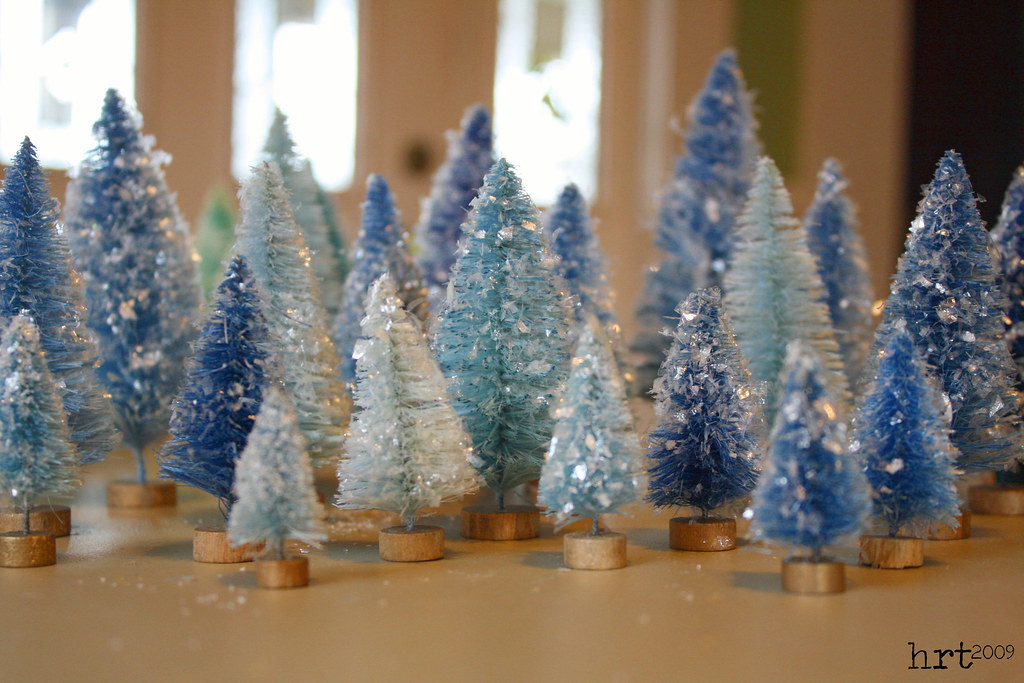
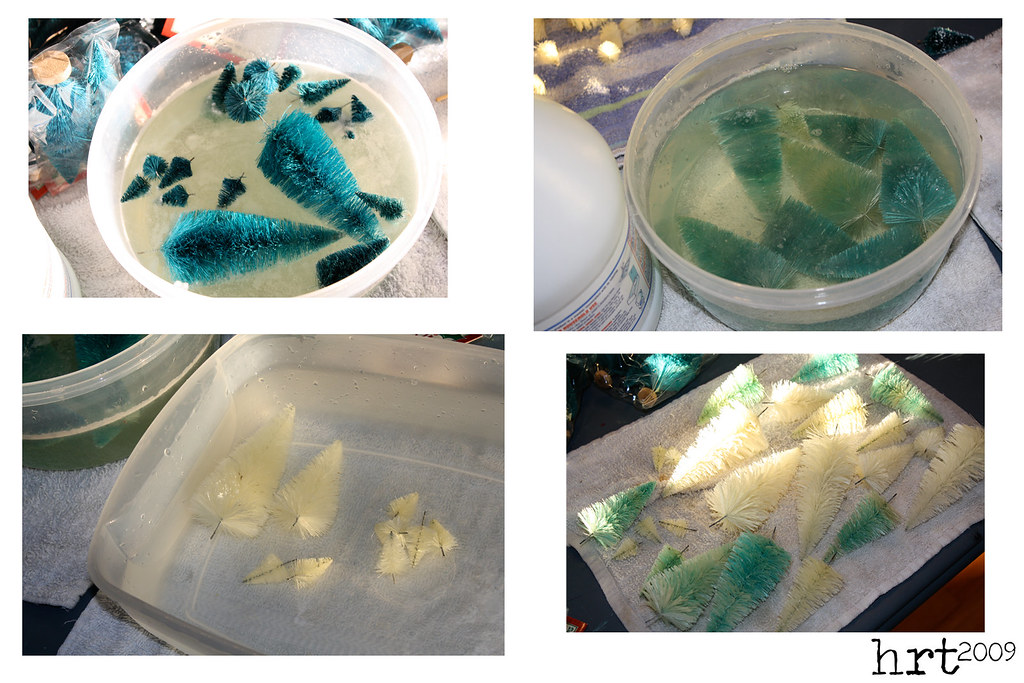
It is really a pretty easy process: remove the wooden bases from the trees, let sit in a bleach & water bath. RINSE WELL. Dip in dye (I just used Rit powder dyes - you only need a little dye and a very short dip to get LOTS of color!)

These trees are made by limiting the amount of time you leave your little green trees in the bleach bath. I think it really gives them a vintage flavor, it's as if they have been around so long they faded. It might be neat to try a bleach bath after dying.

These trees are just bleached - no dye needed for some frosty white trees!

We thought that the pink ones almost looked like candy!

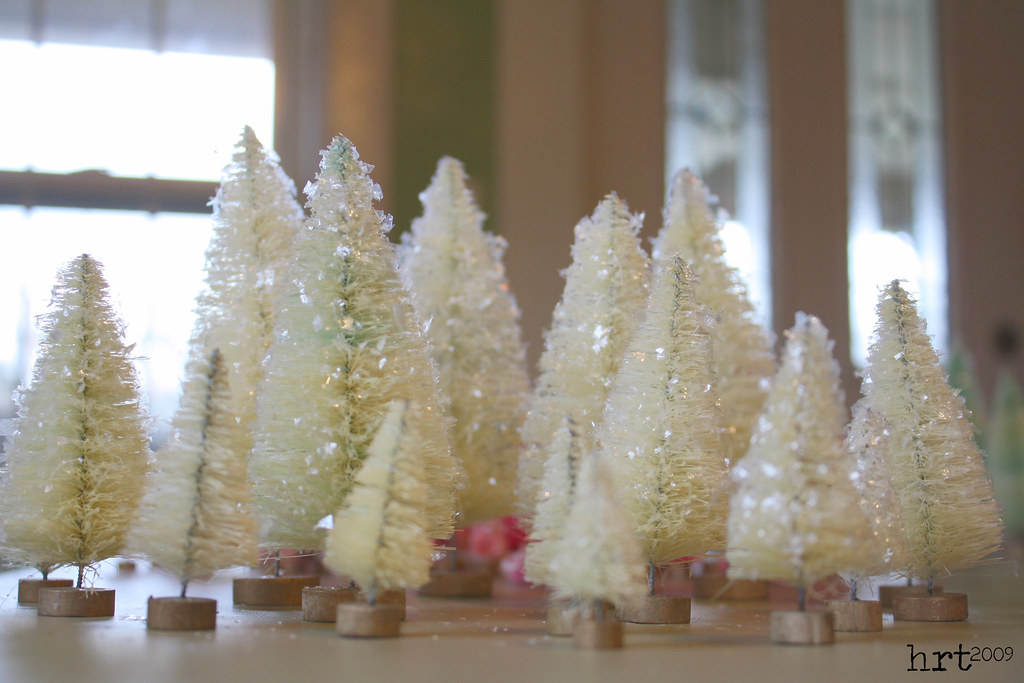
I may have some of these up on my etsy soon... check back :)
ALSO: I will be participating in Sew, Mama, Sew's Giveaway Day - so stay tuned!

Tuesday, November 24, 2009

i'll file away...

I am an unabashed saver - I live with the motto: "maybe i'll need this later" This carries through to bills, receipts, documents, and papers of all types. Behold, the perfect Hawaiian themed file cabinet!

I am really horrible with remembering to take 'before' photos (I am usually SO excited just to get the project underway) so this is as close as it gets. I bought this 2-drawer file cabinet at Goodwill for $5 - it was beige with marble-look drawer fronts - at first glance I thought they were covered with some horrible contact paper. So step one was to spray paint it black.

Then I searched the web for some vintage beachy postcards - and found the motherload! Arkiva Tropika is packed with great tropical ephemera - old menus, postcards, brochures, and the like. I printed those out on some medium weight paper and cut them out.

I laid out all of the images so that they fit on the top and two sides. Then came the modge podge! I painted the mp on the back of the image and on the file cabinet and smoothed them down with my fingers and the occasional aid of a popsicle stick. Then I plastered the top of the image with a nice even layer of mp. Once an entire side was complete, I would paint mp all over it again - after some drying time, this step was repeated five times for each side.

I think it turned out pretty fun and unique - much nicer than a boring old file cabinet :)

Thursday, November 19, 2009

i'd like to thank the academy...

Well, really, I'd like to thank Dee over at DeeRoo Designs! She hosted a wonderful giveaway and yours truly, moi, was the winner! It was a very exciting day to get the mail, I tossed the bills aside and ripped open the manila envelope. Fabric, a circle cutting ruler, a Christmas star block, and a lovely little note - how thoughtful. I am especially excited because that Michael Miller with the purple and green dots - see it? - it's going to be perfect in my ORBC quilt-along round 4 quilt. Now, I jsut have to get to work on that. Hopefully I can clear out a workspace and get down to business next week.

hmm... perhaps winning has inspired me to host a giveaway... keep your eyes open :)

Tuesday, November 17, 2009

pillow expo...

It is always exciting when I can showcase a FINISHED item in my post, and today I have three! I can hardly believe it myself, but I followed through with making coordinating pillows for my wonky log cabin. In total, I made four pillowcases and three throw pillows. I love them!

Nope, can't take creative credit for this one either; but didn't it turn out well? (thanks cluck. cluck. sew.) I love the little nest in the center, and isn't it perfect to go with the wonky log cabin?

Remember this one from a post awhile ago? This one was the most time consuming - I made a template from a picture with the aid of photoshop. Then I traced the template onto wonder-under. Several hours of cutting, ironing, and zig-zag stitching later - this pillow finally emerged!


I love selveges... I didn't know that I loved them til everyone else began using them, but I do. Check out the selvege flickr group for more inspiration.

Update: The two larger (18") pillows are 'envelope' style, so the covers can be taken off. The selvage bolster is sewn closed.

Thursday, November 5, 2009

easy-peasy quilt [tutorial]...

Hot off the presses, this little number has found a new home. My friend Anna is getting married in December and I whipped up this throw for her and her future hubby. Handmade is best for two reasons: (1) it is a unique gift made specifically for someone, crafted from the heart (2) being on a limited budget, I am able to gift something really nice for less than I would pay in the store (and with better quality). As mentioned previously, I don't quilt, so it's knotted, but I like the look. Though a simple project, I thought some of you out in the blogosphere might enjoy a short little tutorial with some helpful tips along the way. Without further ado, here's the recipe:

Easy-Peasy Quilt Tutorial

Finished Size: 60"x70" (10" Blocks)

Ingredients * 1 yard each of 4 coordinating fabrics
* 1/2 yard for binding

* 3 1/2 yards for backing
* 2 yards batting (or enough to fit)

* Perle Cotton or crochet thread for knotting


Directions
* Rotary cut each of your 1 yard cuts into 3 - 10.5" strips


* Cut each strip into 4 - 10.5" squares

[hint: I took some [not all] of my strips and sewed them together in pairs along the long edge. Before unfolding, I cut them into 10.5" pieces. Now when you open up the pieces you already have 2 blocks sewn together. Not sewing all of the strips together allows you more chances to vary the random pattern of the finished block layout]


* Layout your blocks in 7 rows of 6 blocks each
[hint: take a photo of your layout, this will save alot of time when you can't remember which piece you liked where]


* Sew the 6 blocks (each row) together
[hint: PRESS. I used to avoid the iron for as long as possible, it seemed like such a time suck. But then I met Row... steamy, hot... wait we are talking about an iron here, no need to be alarmed. To be clear, my friend Jordan bought me a Rowenta smooth glide iron as a wedding gift and I LOVE it. Pressing during the process makes for a better outcome. After sewing a seam, press the seam without opening it up. Then open it up and press the seam to one side. Repeat this for EVERY seam]

* Pin the rows rst (one row at a time). Make sure that your intersections line-up. Sew the seven rows together, continuing to press as you go.

* Piece the backing: remove the selveges of your backing fabric cut a 75"x43" piece (43" is about the width of your fabric after you remove the selveges). Cut 2 - 20"x43" pieces; sew these two pieces together end to end (you now have 1 - 20"x86" strip). Sew the 20"x86" piece to the 75"x43" piece; trim the excess from the 86" piece so that it is even with the 75" piece. (you now have a 75"x63" piece)

[hint: you may be asking yourself, 'self, why do I need a 75"x63" backing when my quilt is only 70"x60"?' I find it easier to trim your backing to exactly fit your quilt top once the 'quilt sandwich' is made. This is helpful because I am not a perfect cutter or sewer!]

* Make a quilt sandwich: lay out the backing wrong side up, place your batting on top of that, then your pieced top right side up. Voila! quilt sandwich. I use basting pins to hold my quilt together - starting from one end and working up, pin the basting pins where each of the blocks meets another one (where 2 or 4 points intersect)


* Trim the backing fabric and batting about 1/8" from the quilt top on all four sides


* At this point you pick your quilting option. Again, I don't quilt - so this comforter is knotted. Take the perle cotton or crochet thread and thread a needle that accommodates it. Pull the thread all the way through so that the 2 ends meet. Removing one pin at a time, knot the quilt where 4 corners intersect. A square knot is the most widely recommended knot for tying quilts. Here's a
video!

* Prepare the binding strips: Cut 7-2.5" strips from the binding material. Here I will refer you to the best online tutorial I have seen on binding.
Heather Bailey has great illustrations that are easy to follow along with.

Enjoy your finished quilt!

Wednesday, November 4, 2009

give-away goings on...

If you haven't discovered Julie's blog jaybird quilts - you should really head on over there and check it out! Today she celebrates 100 posts and is sharing the excitement with a great give-away!