skip to main |
skip to sidebar
If you have been following along for a little while, you know that I have been overcome by pillow fever. They are just such quick projects for the wow factor that they provide. Plus they have given me the chance to practice my machine quilting [still nowhere near ready to take on a full size quilt]. I joined the Pillow Talk Swap in round 3, which is currently wrapping up. [WHAT?! you haven't checked out the beauties in that swap? You need to click on over there right now... well finish readin' this post first maybe :]
 I didn't realize how much of a challenge this would be. The bar for quality and creativity in this swap is set very, very high. I went through no less than three pillows and zillions of design ideas, before I settled on this pillow. This isn't exactly like any of the pillows in my partners inspiration mosaic, but all of her/his faves seemed geometric and I think this fits the bill.
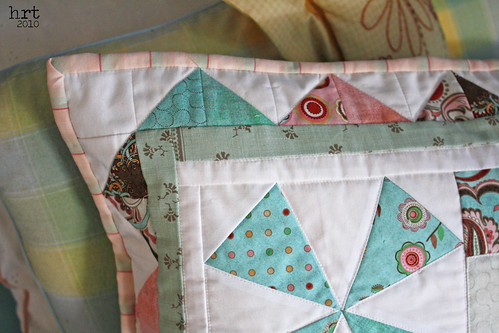 This block is a combination of different patterns: kaleidoscope [using my new ruler!], coin, and bunches of half square triangles. Fabric used is Blush by Basic Grey for Moda and a white Bella Solid - and a tiny bit of French General. The binding fabric is something from my stash, so I'm not exactly sure of the designer or line.Hope s/he likes it - I'm super nervous!
 We celebrated our first anniversary yesterday - it is hard to believe 365 days and all four seasons have gone by already! Many have asked what has been most difficult, what we have learned about one another, and what annoying habits have been discovered. I have no real answer for these questions, we dated for a very long time and knew each other pretty well before we got married. Certainly we grew together over the past year, but there have been no major hiccups or aha moments - it has been a wonderful year for us :]
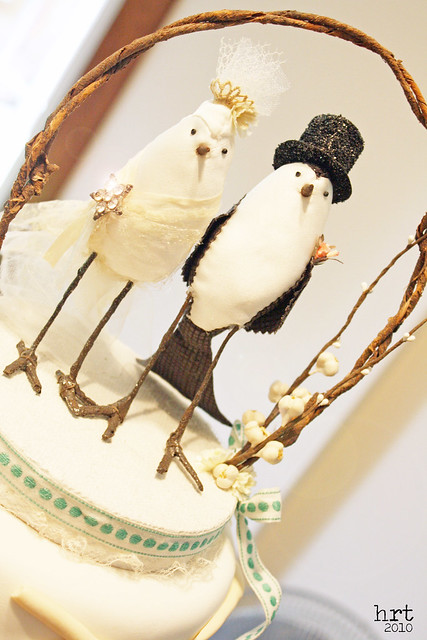
 I wanted to share some wedding cake pictures. I made the topper myself, and it turned out to be the jewel of the wedding decorations, certainly my favorite thing. Recently, I finally threw away the five or so 'test birds' that were in various stages of completion. For being only inches tall, they certainly took quite a bit of work!
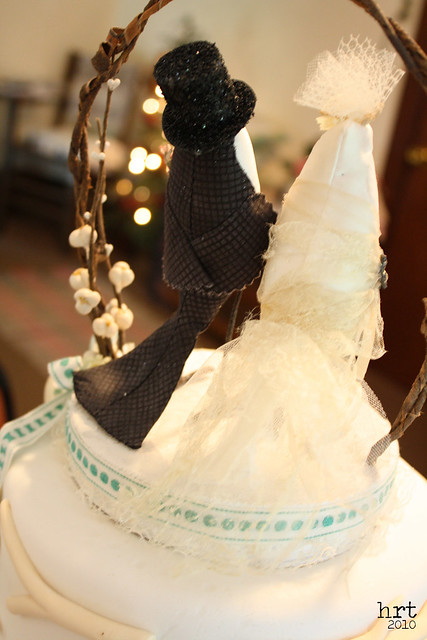 I used several pieces of vintage lace and trim that came from my grandparents attic. Nearly everything is made from scratch: the top hat from cardstock and glitter, the birds are entirely hand sewn, the legs are wire wrapped in strips of papier mache and then painted, the beaks are a sharpened dowels that have been painted... lots of work, but great results :]
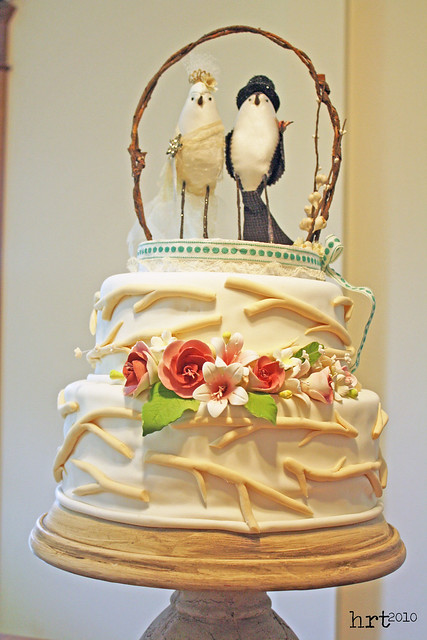
 The cake is vanilla with layers of raspberry cream, made by Camelot Cakes. She is a wonderful baker and decorator. Aren't the flowers lovely? The fondent 'branches' are great touches.
 On Sunday we unwrapped our cake topper. Layers and layers of aluminum foil and saran wrap inside and outside of a Tupperware cake saver. I'm happy to report that it was just as delicious as June 20, 2009 :]Still to come this week:* Pillow Basics #2* Pillow Talk Swap Wrap-Up
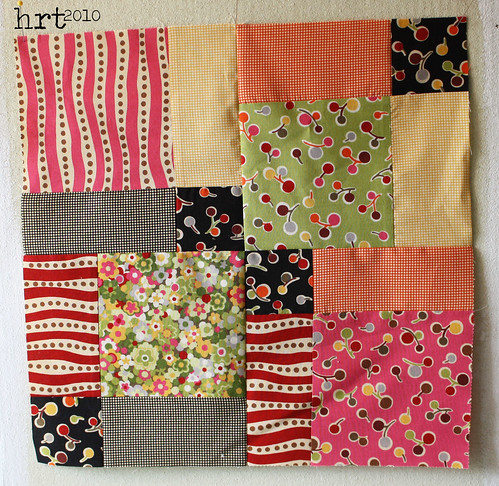 Who finished their swap block in the first half of the month? [hand raises] It's me. It's me! The rest of this month is going to be gone in the blink of an eye, so I thought it best to get Leslie's little block on its way. This was an easy-peasy month - she sent nine 5" squares and asked for a disappearing nine patch. This was my first try at these and I think it has become a new fave. [tutorial for disappearing 9s] I have a charm pack that 'needs' to be used. I love how people have used solid fabrics to make the finished quilt look like it has sashing. Here's an example of what I mean.I finally closed in on my design for the Pillow Swap - let's just say lots of half square triangles in the works!
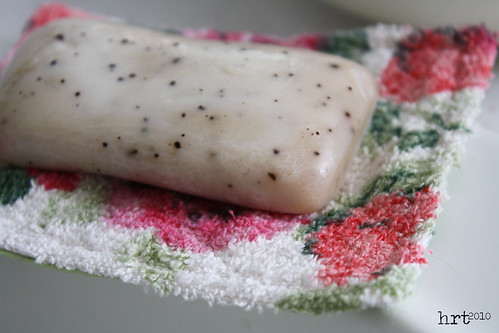 Yes, I did have to google 'names for bathrooms' to find the correct spelling for loo [formerly I thought it was like 'in lieu of']. We have several friends, both online and the neighborly kind, that make handmade soaps. I really love how clean they get your hands without being harsh on your skin. I was, however, tired of cleaning soap gunk off of the sides of the sink and also a little tired of having the soap slip into the sink bowl. Then I remembered this post, which links to another post, which references a tutorial found here about a dish drying towel made from old bath towels. [there's another tutorial here] In a few frenzied minutes of cutting and stitching had this:

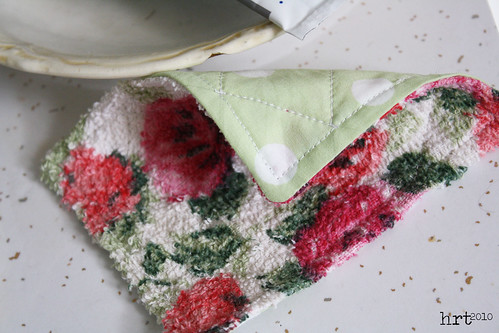 Very, very simple:1. cut 2 - 4.5" x 5.5" rectangles [one from a quilters weight cotton and one from a towel]2. with right sides together, sew the two pieces together. leave a small opening on one side.3. turn, press, sew a scant 1/4" along each side. quilt as desired [I used a 1.5" grid pattern]
 I also wanted to share a space saving little number that I made for my jewelry. Again, not my idea - it's just an old frame that I painted white and stapled screen to. Little bent wire hooks hold things in place.I need to make new curtains for the bathroom as well... another project for another day...
 My obsession with pillows has led a couple of people to ask if I have any tips or a basic tutorial. I love to share and teach, so over the next few weeks you can watch as I put together a pillow with step by step instructions. There is nothing new or amazing with my instructions - just things I have picked up along the way or have found to be time saving. [after all, pillows aren't exactly a new thing] I created a button that you can add to your blog it's on the right sidebar -->Step #1
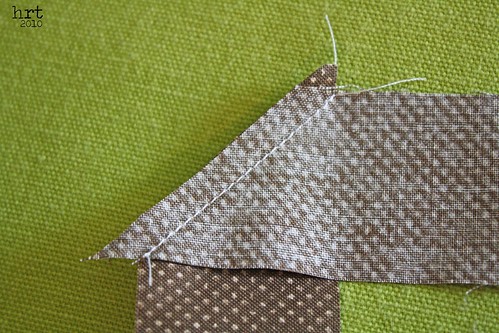
 I usually use a pieced or appliqued top, so that needs to be finished first. note: squares work best as the majority of pillow forms are square and come in 2" increments [i.e. 10", 12", 14", etc.]Take your finished pillow front and lay it over a slightly larger piece of cotton batting. Smooth it out flat, then pin baste. [here is a tool I use that helps this process along] I do not find it necessary to add another fabric layer to this sandwich because when I wash my pillow cases I simply safety pin the back of the pillow to the front.Machine or hand quilt however you would like. If you machine quilt, trim the threads on the back as you start and stop sewing, but leave the ones on the front long.After quilting, remove the basting pins. Now, take a needle and thread it with one of the loose threads on the pillow top. One at a time, bring each of these threads through the stitching line to the back. This leaves you with a nice top - no little tiny thread-ends sticking out.Trim the excess batting so that it is even with the pillow front.WOW - I bet you are so excited for step #2 - it's coming soon...
 Well April may not have had the whole lion/lamb scenario happening, but May certainly did! May ended and June began with terrential rain storms and on Saturday we were visited by a tornado! Many folks near us had shingles torn off their homes, trees uprooted, and flooded basements. We were lucky with only 'secondary damage.' You may be wondering what I mean by secondary damage... Living in small town America means that a tornado is the talk of the town - and yes, that means you have to go drive by it [and not watch where you are driving]. So as I was stopped behind someone turning left, the person behind me rear ended me. Apparently watching people pull a giant tarp over their house was the thing to look out for. No major damage that I know of - we will probably take the car to get checked out at the dealership to make sure that is the case. Nothing says Sunday like hanging out on the side of the road with our friendly neighborhood police officer :] storm details
 On a friendlier note, we had some little visitors in our yard the other day! Three little birdies were scattered around our yard last Tuesday. Momma bird was responding to their tweets, carrying worms around to each one of them.
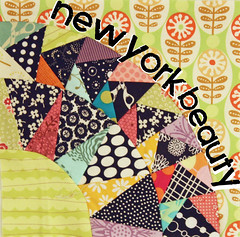
 Oooh, look - something crafty on a craft blog :] Mary sent us on an adventure, this was my first attempt at foundation piecing. She provided the fabric and the printed muslin squares. I was able to finish 1 1/2 blocks, it was fun to learn but I still struggle with choosing the right size fabric piece to use.p.s. still looking for a couple of testers for my sewing machine cover tutorial - any takers?


